Quantcast
Channel: Another Forensics Blog
Viewing all 40 articles
Browse latest View live

Searchhs.dat and the Bing Bar

$
0
0


I recently worked a case where I located some relevant information in a file called "searchhs.dat".  This file was located in the users directory under "\AppData\Local\Microsoft\BingBar\Apps\
Search_6f21d9007fa34bc78d94309126de58f5\VersionIndependent" and  "\AppData\LocalLow\Microsoft\Search Enhancement Pack\Search Box Extension\" (Note - this was on Windows 7).

The Bing Bar is a free add-on  from Microsoft that integrates with Internet Explorer.  For more information, read here.  Users can search directly from the Bing Bar and the search terms are stored in the searchhs.dat file mentioned above. 

 A quick Google led me to two programs that had the ability to parse this file: sep-history-viewer and ESPv2. sep-history-viewer displays the  record id, term length, search term, count and a time stamp of the last search.  At this time, ESPv2 only displays the search terms.[Edit - as of 7/18/12, ESPv2 now supports record id, term length, count and time stamp in addition to the search terms]

Now it was time to dig deeper and verify the results with the raw data.  I opened up the searchhs.dat file in HEX view and  saw the URL entries.  I did some quick research and was not able  to locate the file format specification for the file. The author of ESPv2  kindly responded to an email and gave me the repeating header and record id.

However, the information I was really interested in verifying was the date. I (begrudgingly) installed the Bing Bar, fired up IE and did some testing.  After running several searches and reviewing the file in HEX (using  X-Ways) I was able to determine the location and format of the last searched for time stamp along with a few other things:

Black:   Repeating header
Blue :    Record ID
Yellow: Count - appears to increase each time the search term is used/selected
Red:     UTC Date in 128 bit System Structure (decode works nicely to convert)
Purple:  URL length


I have a feeling I am probably missing some posts/blogs/articles that were made on this, but thought I would add to the collection  just in case.  Remember - do not take my word as the "be all to end all" and test, test, test!


Windows Backup and Restore

$
0
0

A recent investigation led me to a Windows Backup file.  Windows 7 as well as Windows Vista includes a utility allowing the user to backup and restore folders, files and system information. This is not the same as Volume Shadow Copies (VSCs), another method wherein Windows backs up files.  For information on how to examine VSCs  check out Harlan Carvey's book, or other blog posts here and here.  Depending on the version on Windows, the backup can be stored on an external device, such as USB drive or over the network (Windows 7 Pro/Ultimate).   My research was done with Windows 7 Home Premium and Ultimate.

Windows creates a backup with the following naming convention:
ComputerName\Backup File YYYY-MM-DD ######\Backup files ##.zip


Interestingly enough, if an end user looks at this backup through Windows, they will only see the top level folder:


Windows Backup creates multiple zip files containing the files/folders that where backed up. True, if you mount the zip files in your favorite all in one forensic tool you will have access to all these files in their glory. You can run keyword searches until you are giddy, and forensicate to your heart’s content, BUTthe dates in the zip file are the dates the backup was created, not the date the file was originally created or modified.  That being said, Windows Backup tracks these original dates which may come in handy.

Windows Backup tracks the names of the folders, files and original dates in a file named GlobalCatalog.wbcat under ComputerName\Backup File YYYY-MM-DD ######\Catalogs. If you do not have access to the back up media, a local GlobalCatalog.wbcat file is created. I discuss this in more detail below.
 
Ideally, this file could be parsed for all of this information, with the results displayed in a nice format, CSV or otherwise.  I have been looking at this file in hex trying to figure out a way to accomplish this. So far, I have located the file names, folders and dates, but have not figured out how the records are tied together within the file.  Boooo…. If you know of any existing program or script that can parse the data, or know the file format, please let me know. If you are interested in seeing a sample of what I have located so far, contact me (arizona4n6 at gmail dot com) and I can send it to you.

As such, viewing the backup file natively through Windows Backup is the only method I have discovered  to see the original dates for the files and folders. Step by Step directions follow: 
  •  Export the backup files from your image to an external device. If you prefer to mount the image, create a VHD using Vhdtool  on a DD image and attached the VHD through the Disk Manager. Make sure its a copy of your image as Vhdtool will make changes to it.  This should sound familiar if you have read Harlan's Post on using the Vhdtool to examine VSCs. I tried to mount the image using FTK Imager and the backup file was not seen by Window's Backup.
  •  Launch Windows Backup and Restore (Control Panel>System and Security>Backup Your Computer).
  •   Got to Restore>Select another backup to restore files from. It should auto locate the Windows Backup.


  • Next, Search for *.*, and all the files will be listed or you can browse to a particular file if you please. By default, only the Date Modified is listed.  If you right click the title bar, you can select the Date Created as well. If you use the Browse function instead of Search, you will also have the option to see the backup date.


Now, instead of seeing all the same dates and times for the files contained within the zip files, you are presented with the original Date Created and Date Modified for files. As I mentioned before, it would be soooooo nice to have this information parsed directly from theGlobalCatalog.wbcatfile.


Windows Backup Registry Entries
When a Windows Backup is created an entry is made or updated in the Software Hive under the key \Microsoft\Windows\ CurrentVersion\WindowsBackup\.

This key holds various sub keys with information regarding the backup including USB device information. This USB information may come in handy if you are also conducting link analysis/USB analysis and can be cross referenced with other registry keys.

Some of the information available with sample data :

Target Device

For a USB Device:

  PresentableName = E:\
  UniqueName = \\?\Volume{a2e6b4d4-e492-11e1-a39d-000c29448ee3}\
  Label = MYTHUMBDRIVE
  DeviceVendor  = SanDisk
  DeviceProduct  = Cruzer
  DeviceVersion  = 1.26
  DeviceSerial = 200605999207D70370EF         

 For a Network Share:


  PresentableName = \\COMPUTERNAME\Users\Public\Documents\backup\
  UniqueName = \\?\UNC\COMPUTERNAME\Users\Public\Documents\backup\


Status
  
  LastResultTime = Sun Aug 12 17:45:39 2012 (UTC)
  LastSuccess = Sun Aug 12 17:45:39 2012 (UTC)
  LastResultTarget = \\?\Volume{a2e6b4d4-e492-11e1-a39d-000c29448ee3}\
  LastResultTargetPresentableName  = E:\
  LastResultTargetLabel = MYTHUMBDRIVE


According to my testing, the LastResultTime and LastSuccess will be the same if the backup completed. If the backup did not complete or was cancelled, these times will be different, and the LastResultTime will contain the time of the attempted backup.

I have created an Reg Ripper plugin and passed it along.  It should be included in the next disto.
 
Other Artificats
A Volume Shadow Copy is created before the backup.

Event log entries in \Windows\System32\winevt\LogsMicrosoft-Windows-WindowsBackup%4ActionCenter.evt

Local GlobalCatalog files created:

    \System Volume Information\Windows Backup\Catalogs\GlobalCatalogCopy.wbcat

    \System Volume Information\Windows Backup\Catalogs\GlobalCatalog.wbcat

This local GlobalCatalog.wbcat file seems to contain not only entries for the last backup, but for previous backups done, as well as previous media used. This could be helpful if you need to locate/subpena various devices that contain backups. Below are some results from running Strings across this file:

COMPUTERNAME\Backup Set 2012-08-11 213315\Backup Files 2012-08-11 213315\Backup files 1.zip
\\?\Volume{177d1d16-e2fc-11e1-914b-ec9a745b406c}\
SanDisk
Cruzer
1.26
200605999207D70370EF
COMPUTERNAME\Backup Set 2012-08-11 213315\Backup Files 2012-08-11 213315\Backup files 2.zip
Backup Set 2012-08-12 194644
COMPUTERNAME\Backup Set 2012-08-12 194644\Backup Files 2012-08-12 194644\Backup files 1.zip
\\?\Volume{45f45fcd-e269-11e1-a36e-ec9a745b406c}\
Kingston
DataTraveler SE9
PMAP
COMPUTERNAME\Backup Set 2012-08-12 194644\Backup Files 2012-08-12 194644\Backup files 2.zip
COMPUTERNAME\Backup Set 2012-08-12 194644\Backup Files 2012-08-12 203800\Backup files 1.zip
COMPUTERNAME\Backup Set 2012-08-12 194644\Backup Files 2012-08-12 203800\Backup files 2.zip

As I mentioned before, I am trying to figure out the GlobalCatalog file format, so if you know the file format, or any tools that can parse it, please let me know :-) 

Automated Plist Parser

$
0
0

Plist files in the MAC world are the equivalent to, or as close as you are going to get to registry files on Windows Systems.  They contain system settings, application preferences, deleted user accounts and much much more.  These files come in two formats, Binary and XML.

Plist files, IMO tend to be in various places all over the file system.  For example, plist files specific to the user may be under the /User/*Username*/Preference folder, and plist files for the system will be under /System/Library.

During MAC exams, I feel like I am running around looking for all these crazy files (which is tough to do if you have heels on).  Additionally, for each exam there are a standard set of plist files I need to gather, such as OS Version, Time Zone, Deleted Accounts etc.  I may also spend a significant amount of time researching and locating plist files for specific applications and wanted a way to document and share this information. 

Anytime something becomes repetitive, it’s a good chance to write a script or develop a tool to automate the process.  A perfect example of this is RegRipper.  It parses the registry for common (and even uncommon) keys, and gives the community an easy way to add  plugins for additional registry keys.  

So, using RegRipper as source of inspiration, I set out to develop a tool that accomplishes an automated way to parse plist files.  I  am almost done developing it and in the testing phase.  The tool runs on Windows with a GUI, and requires the MAC image to be mounted .  Adding your own plist file to parse  is relatively simple  - an entry in an XML file that specifies the location of the plist file such as /System/Library/CoreServices/SystemVersion.plist and a description. 

I will be adding in all the plist list files listed under the OS X 10.7 artifacts on the appleexaminer.com website which should be a good running start.

I am almost done. I figured once I blogged about it, it would commit me to putting the finishing touches on and wrap it up. If you have a clever name for it, let me know. All I have manged to come up with is iParse (ha ha).

If your interested, check back next week and it should be done. [Edit - the tool is now available, please see this post  or download here]


iParser: Automated Plist Parser Release

$
0
0

Let me preface this  with saying, I.A.N.A.P.P. – I Am Not A Professional Programmer. I enjoy programming, and I hope others find this tool useful.  If you find a bug, please let me know.  If you have some suggestions or feature requests, please let me know. What may be intuitive to me may be totally off for others. I also wanted to thank Cheeky4n6Monkey for designing an icon for me as I have zero graphic skills, and Scott Zuberbuehler for doing some testing and making some suggestions for improvements.


What does it do?
The concept behind iParser is to provide an automatic way to gather various plist files from a MAC image into one place, rather than look for them every time an exam is conducted.  You simply mount the image, point to the root directory, choose a user and let it run.  It will gather system information, application preferences, network information and user information.  It converts binary plist files into XML using the iTunes plutil, then parses the XML and generates a text report.  Although you can use notepad to view the report, I find that Notepad++ works better. If you are unfamiliar with plist files, please read here

Using RegRipper by Harlan Carvey as my inspiration, I decided to use plug-ins to define the plist files so that users can add in plist files as they see fit. I used the OS X 10.7 artifact list by Sean Cavanaugh from http://www.appleexaminer.com/as a starting point for the plist files that will be parsed.

What does it not do?
It does not convert the data within the plist file.  For example, in the Safari History plist file, it will not convert the timestamp. It does not decode base64 data. It basically strips out the XML tags and builds a report.

Looking ahead
Yes, this is a Windows based program (sorry). My hopes are to dig my heels in, learn some Pearl, and make it cross-platform compatible.  I have a new found respect for the work and ingenuity of RegRipper and realize how spoiled I have been by such a great tool...

Requirements

  • Windows
  • Mounted Mac Image or access to Mac partition from Boot Camp
  •  iTunes 
  •  .Net Framework (quick install if you don't already have it)

Plugins
The Plug-in files are in XML format. You can easily add a plist file that is not already included. I have detailed instructions on the format here, or just open and view some of the existing plug-ins to view the format. If you would like me to add any plug-ins to future releases, please email me:  arizona4n6 at gmail.com - or email me if you can't figure out the plug-ins and would like me to add a plist.


Download and Documentation
Download iParser here
View the Documentation here


Google Analytics Cookie Parser

$
0
0
I recently watched an excellent webcast on the SANS website archive about ‘Not So Private Browsing”. In this webcast, Google Analytics cookies are covered, and the wealth of information that can be found in them. I also located a great article on the DFI News website that covers these cookies as well.
 
I won’t go into detail here, as both of the above mentioned resources do a great job. But, briefly, the Google Analytics cookies can contain information such as keywords, number of visits, and the first and second most recent visit. According to the SANS webcast, approximately 80% of websites use Google Analytics, so there is a good chance you may find some of these in your exams.

There are three types of cookies that contain information of value: __utma, __utmb and __utmz. The four main (debatable, I know) browsers store them differently. Internet Explorer stores them in a text file, Firefox and Chrome in an SQLite database, and Safari in a plist file.

The values in the data base look something like this:
  • __utma: 191645736.1125870631.1349411172.1349411172.1349411172.1
  • __utmb: 140029553.1.10.1349409002 
  • __utmz: 140029553.1349409002.1.1.utmcsr=google|utmccn=(organic)|utmcmd=organic|utmctr=php%20email%20throttling 
For example, the values highlighted in red are timestamps in Unix epoch, and the "1" in blue is the number of hits.  As I mentioned before, both SANS and the DFI News article break down how to parse these out in detail.

I have written one tool that will parse the Google Analytics cookies for these four browsers, GA Cookie Cruncher:

Internet Explorer - point the tool to the folder containing the cookies (either export out the cookies folder, or mount the image). The tool will read each cookie within the folder, determine if it has these values and parse them accordingly.

Chrome – point the tool to the cookies sqlite database (either exported from your image, or mounted). The tool will query the database for all the Google Analytics values and parse accordingly.

Safari (Mac)– point the tool the the cookies.plist file. It will parse the plist file and the the Google Analytics cookies within.

Firefox- The Firefox cookies are stored in an SQLite database. Unfortunately, the wrapper library I used can not access this SQLite Database. I also tried to test the Firefox cookies database with the free SQLite Browser which could not read it either. So far, the only tool I have been able to access this database with is the SQLite Manager plugin for Firefox.

The work around I implemented is load the Firefox cookies database into the SQLite Manager plugin. From there, export out the mz_cookies table into a CSV file. This csv file can then be parsed by the program. I know, extra work, sigh - but it’s still better then manually parsing through that data.


I have  included a little hint in the "Browser Information" box to remind you where the default location of these cookies are for whatever browser you select. I cant event remember where I put my keys, so I thought this might be helpful.

The program creates 3 files in CSV format: %Browesername%_UTMA, %Browesername%_UTMB and %Browesername%_UTMZ

 Here is some sample output from Internet Explorer from a __utmz cookie:


 Now, I haven’t tested this on every browser version out there, and I have seen some variations on the way the cookies are stored. Some initial tests indicate that IE 9 does not seem to track these values, but more research will need to be done to confirm (thanks to cheeky4n6monkey for the testing).  If the tool does not read your cookie file, I'm happy to help, just shoot me an email.

Download the GA Cookie Cruncher here.

Enjoy!

iParser Update: Batch Processing Added

$
0
0
I figured before the end of the year I should cross off at least one thing on my list I have been meaning to do. When I first released iParser, I had some feedback asking for a way to batch process plist files (thanks to a tester who has asked to remain anonymous). Due to some other projects, work and life in general this went on the back burner for a few months.
  
What got me moving on making the improvements was a recent exam on an iPhone.  I wanted a way to parse all the data in the plist files. Once I wrote the batch processing option in iParser, I simply exported out the plist files from the phone into a folder, ran iParser and had a report to review.

The above is just one example of how the batch processing can be utilized. As long as you have a plist file, you can use iParser.  Keep in mind the power of the plug-ins though.  If you keep on parsing the same files from an image, take a moment to add the plist as a plug-in (see my instruction here).

I hope this will add more flexibility to the program.  Thanks to everyone that provided feedback.  It may take a little bit for me to get around to it, but I do listen and hope to keep making improvements.

Download iParser v.1.0.0.20 with batch processing.


Dude, Where's My Data?

$
0
0

Harlan's tweet (view picture to the right) got me thinking, and I would like to share a case example that I feel drove this particular point home for me.

 Many of the 'Swiss Army' forensics tools will parse data for you and automate various tasks. For example, X-Ways will parse link files and EnCase will  parse (or mount, whatever term you prefer) PST files. Instead of exporting out these files and working with them in separate programs, these Swiss Army knives will display the data in a more readable format within their GUI.

Cell phone forensic programs work in a similar fashion. They will first acquire the phone (if you’re lucky that day) then parse typical data such as SMS and MMS messages, call logs and contact information. These programs can also generate a pretty report for you to turn over to your clients (whether it’s a prosecutor,  a defense attorney or your cousin Vinnie). As an examiner, this can be great thing.  No need to locate and export the database, run queries and convert timestamps.

Each of these programs has taken a task that is repetitive and automated it - in most cases, saving the examiner time. But where is the Swiss Army knife getting its data from, how is it interpreting it and  is it getting all the data?
 
Now, to get to my case example.  I had an iPhone where I was tasked with getting the voicemails.  In order to do this I had three “Swiss Army knife” tools at my disposal:
  • Swiss Army Knife A – $$$$$
  • Swiss Army Knife B – $$$
  • Swiss Army Knife C – $
All three programs were able to acquire a file system image of the cell phone as well as parsing the SMS, MMS and call logs, but what I needed were the voicemails.  Only one of these tools (A) automatically parsed the voicemail.db file which contained information regarding the voicemails. I did locate the voicemail.db file within the file system of the two other programs (B and C) - the programs just didn’t parse this database automatically.

Now, if an examiner had just the option of B or C that did not automatically parse the voicemails and point them out – would they have assumed there were no voicemails? Ok, this may not be the best example as voicemails are a pretty common thing, but what if it were a not so common artifact?

I decided to use A to conduct the remainder of the exam since it had already parsed the voicemails saving me the time of exporting out the database, running quires and converting timestamps. I could now get a pretty report.   I went to generate the report and the program threw an error. No report, no exported voicemails.  Dude, where's my data?
 
In my quest to find out why the $$$$$ Swiss Army knife threw an error, I went to view the contents of the voicemail.db file to see if there was some abnormal data causing issues. I opened the voicemail.db file with an SQLite viewer and noted several columns of data NOT displayed by the $$$$$ program.

Included were two columns I thought right off the bat could be important – a "flag" column and a "trashed" column. The flag column designates certain statuses of the voicemail such as heard, unheard or deleted. The trashed column is the date that the voicemails where placed in the deleted folder. What if the examiner needs to prove the suspect had listened to a voicemail?  I know I don't always listen to my voicemails (sorry Kim) and opt to just call the person back instead. (Now I know you can't prove they listened to it, per say. Maybe their speaker was busted,  or their nephew had their phone but this is just an example for illustrative purposes so just roll with me).

After some more testing, I determined it was blank values in the database that were causing errors with the reporting. Was I going to wait for the next software update to get a report? No. Time to work with the data myself. I had three options:

Good → Export the data from the database into an Excel sheet, use formulas to convert the timestamps

Better → Write a script to parse the data as I would probably need it again

Best → Have someone else write a script to parse the data

Now, arguably, Better and Best could be switched.  It’s always good to write your own tools so you gain a deeper understanding of the data. However, in my case I had someone (Cheeky4n6Monkey) reach out to me when I was working on iParser asking if I needed any help.  I know he enjoys learning and is always looking for a forensic project to help on. So rather then write my own parser  I thought this would be a nice project to involve him in.

A few emails later I had a custom tool written by him that gave me the exact data I wanted and hopefully he got to learn something in the process too.

So in summary, I am going to quote Harlan’s tweet again:

 How much do you know about what your tools do for you?  May I make the following suggestions?  Look at the data with different tools to see what your tool may not be doing. Look at the raw data, or look at the data in its native format to see how your tool interprets the data and what it may be missing. Read the forums associated with your tool, see what it may be capable of that you are missing out on based upon how others use it.

Do they get the data you need? In my case, not always. Sometimes I need to roll up my sleeves and do the dirty work by myself (err, in this case I asked someone else to join in with me).

Do you know what you need? How do you know what data you need, if you don’t even know it exists? Keep researching, reading blogs, watching webcasts and asking questions.  Don’t assume that everything will be handed to you on a silver platter by your tools.

Umm, in case you don't get my movie reference, Google "Dude, Where's My Car"  :-)


Finding and Reverse Engineering Deleted SMS Messages

$
0
0

Recovering deleted SMS messages from Android phones is a frequent request I get. Luckily, there are several places and ways to recover these on an Android phone.  After working a case that involved manually carving hundreds of juicy, case making messages, I collaborated with cheeky4n6monkey on a way to automate the process.  A huge thank you to Adrian, because I think the only way to truly appreciate the script is to do the manual work first.

That being said, in my last post Dude, Where's my Data I explored the importance of knowing what your automatic tools are doing and digging deeper as there may be critical information these tools are not parsing.   Harlan Carvey contributed a great comment which I think sums it up nicely: “Tools provide a layer of abstraction over the data itself, often hiding the data from the analyst who is not curious.”

I am not trying to give these tools a bad rap.  In fact, I use my "all in one" tools every day. However, by understanding the raw data, you can leverage these tools to help you find and understand critical data not automatically provided.

Recently I used Cellebrite to understand the structure of SMS messages, which I could then apply to SMS fragments found in unallocated space and the mmssms.db-journal file.  Although Cellebrite recovers deleted messages, it does not do so from areas outside of the SMS database (to my knowledge).  Of course, these "other places" contained the most important data for my case.

In this post, I am going to cover some common locations in the file system to recover deleted text messages.  Additionally, because the SMS structure can vary across Android devices, I am going to show how I deconstructed the SMS message, and then applied the information to SMS messages found in unallocated space.  I am sure there is more than one way to skin this cat, some may even be better; this is just the way I did.

For this example, I used a Samsung GSM SGH-T959V Galaxy S.  Even if you don't do Mobile forensics, the principles of this example can be applied to determine structured data found in unallocated space.


Where the Messages are hiding

When working with cell phones, several types of acquisitions may be taken:  logical, file system and physical.  A logical acquisition is usually the information as the end user sees it.  Text messages, call logs etc.  It does not include deleted data.  A file system acquisition is the next step up. It provides access to the files system, but not unallocated space.  A physical acquisition is a bit by bit copy of the flash memory and thus, includes unallocated space. For more information on these three types of acquisitions, check out this page on Mobile Forensics on Wikipedia.

For recovering deleted text messages a physical extraction is the best.  However, there are several locations in a file system extraction that can yield deleted text messages: the SMS Database, the SMS journal file and a log database.

SMS Database

Text messages are stored in an SQLite database named mmssms.db typically under the location /Root/data/com.android.providers.telephony/databases/. These SQlite databases retain deleted data. If you are using a program like Cellebrite, it will "automatically" recover deleted text messages from this database. However, I also manually check for fragments using a Hex viewer, or an SQLite Viewer like Oxygen Forensics SQLite Viewer. They offer a 30 day free trial if you want to play around with it. This SQlite Viewer show blocks of deleted data:


SMS Journal File
The mmssms.db-journal file is a roll back journal file written to by the SQLite Database. If this file exists, it will be in the same directory as the mmssms.db file.  It can contain numerous deleted text messages. Since cheeky4n6 monkey helped develop a script to parse this, he has done an excellent write up on the format and structure which I will post a link to once its up.  I won't go into too much detail here, except to say the text messages contain the same structure as in the SMS database.

logs.db
This file appears to be a database that logs various activities on the phone such as calls and SMS messages.  The field holding the SMS messages appears to contain the first 50 or so characters of a text message.  Because it is an SQLite database, you can view deleted data as explained above.

Unallocated Space
Glorious unallocated space - my favorite location to find deleted text messages.  I have found hundreds of deleted text messages here through various keyword searches.  If you are lucky, you can carve a whole mmssms.db SQLite database from unallocated space as explained here by Richard Drinkwater.  This will allow you to open the complete file with an SQLite viewer and view information such as the phone number, date, sent date, status and folder.  If not, this is where leveraging your tools can help you parse this information manually.

Determining the SMS structure

Case Setup:
Let's say a bowl of Trix has been eaten, and you need to determine who did it and when.  A keyword search for "trix" brings you to the following message in unallocated space (phone numbers have been changed for this example):


 As you can see from the example above, the phone number and SMS body are readily apparent.  However, just by looking at the ASCII data on the right, it is not possible to tell if this was a sent or received message. In this case, that is critical information.  If the message was sent, the suspect whose phone you're examining ate the Trix.  If this text message was received from somebody, the sender ate the Trix.  We also need to figure out what the date of the message was.

The steps I use to determine the structure of the SMS are as follows: View the SMS database to see the schema and the format of the data. Do some pattern matching using existing SMS messages and apply the pattern to deleted messages.

First, I use one of my 'all in one' tools to see if it was able to parse the existing messages on the phone. Below is a text message in the existing inbox of the phone (picture from Cellebrite):


By viewing the mmssms.db file in Hex view and locating the text message above, I can begin to see how this data is stored in a raw format. I can see information such as the phone number, body and SMSC (the phone numbers are normally 10 digits long, but messages from T-Mobile come through with a phone number of 456). I know the date information must be hiding in here somewhere:


By viewing the Schema of the mmssms.db SQLite database table that holds the SMS messages and viewing the message within the database, I can gather more information about this message:

Schema 


Message


 By looking at the database, I can see that the date is stored in Epoch, and there are some flags that look like they might correspond to whether the message was sent or received – the fields named “read” and “type”.

By using all of this information, I can begin to figure out the structure.  The order of the fields in the raw data follows the order of the SMS schema. For clarity's sake, I have only included the most common fields in the picture below:


Address:
The Phone number associated with the message.

Date Field
To determine how the date is stored, I viewed this value in the database and noted it was stored in Epoch.  I tried converting the Hex value 01 3C 5D BC 32 76 to decimal which is 1358782280310. This value matches the value in the database. Converting to UTC yields Mon, 21 January 2013 15:31:20 UTC, which matches the value displayed by Cellebrite.

Read/Type
By using my all in one tool, I looked through the existing SMS Messages and cross referenced these values to what I was seeing in the database to establish what the flag values of "read" and "type" mean.
    Read:
        00 = Message was unread
        01 = Message was read
    Type (Aka"folder"): 
        01 = Inbox
        02 = Sent

Now I can apply the same structure to the message found in unallocated space and parse it manually:


 Date: Hex value 01 39 22 20 57 66 to decimal which is 1344897308518. Converting to UTC yields Mon, 13 August 2012 22:35:08 UTC

Type:  02 which means the message Sent.

So now I have some valuable information about this deleted text message. This message was sent by the user of the phone indicating they ate the Trix, and the message was sent on August 13, 2012 at 3:35PM AZ time.

I should also mention that within Cellbrite, you can view an existing message in the mmssms.db file in Hex view.  Cellebrite color blocks data it has parsed, and when you hover over a block, it will show you what values it parsed. I wanted to show the more "manual" way first in case some other tools do not do this, or if for some reason the database was not parsed, which I have ran into. Please note, it does not do this for messages in unallocated space.

 
Depending on the phone, the SMS structure may be totally different. Also, because the information is stored in a SQLite database and deleted fragments may be located outside of an SQLite database, there does not seem to be a "header" or "magic number" to carve for.

Here are three SMS schemas from three different Android Phones. Some different fields of interest have been circled. The same method used above could be used to determine how these values are stored "in the raw" to parse deleted messages found in unallocated space.


Samsung CDMA SPH-D720 Nexus S


Samsung GSM SGH-T839 Sidekick 4G

Samsung GSM SGH-T959V Galaxy S

 
As you can see from the three phones above, each phone has a different way of storing the SMS messages which can make it difficult to write a script to "recover all deleted text messages from all Android phones" -I have left that up to the monkeys - well at least one cheeky one.

Addendum [added 02/18/2013]
Please make sure and read the comment posted by Brian below. He makes a great point.  For any of the above to work, the data generated by the forensic tool/software needs to be validated against the actual device. I had done that in this case, but failed to mention it.

[added 02/25/2013]
Adrian's script is now available, make sure and check it out.

Google Analytic Values in Cache Files

$
0
0
A while ago I wrote about Google Analytic Cookies. These cookies can contain information such as keywords, referrer, number of visits and the first and most recent visit.  This information is stored in cookie variables called __utma, __utmb and __utmz.

These __utma and __utmz values are not just stored in Cookies, but also in Google Analytic GIF
requests, which in turn are stored in the browser cache files.

Webmasters using Google Analytics put a piece of code on their page that might look something like this:

<script type="text/javascript">
  var _gaq = _gaq || [];
  _gaq.push(['_setAccount', 'UA-12345678-1']);
  _gaq.push(['_trackPageview']);
  (function() {
    var ga = document.createElement('script'); ga.type = 'text/javascript'; ga.async = true;
    ga.src = ('https:' == document.location.protocol ? 'https://ssl' : 'http://www') + '.google-analytics.com/ga.js';
    var s = document.getElementsByTagName('script')[0]; s.parentNode.insertBefore(ga, s);
  })();
</script>

According to Google:

 “When all this information is collected, it is sent to the Analytics servers in the form of a long list of parameters attached to a single-pixel GIF image request. The data contained in the GIF request is the data sent to the Google Analytics servers, which then gets processed and ends up in your reports” 1

This GIF request looks something like this - notice the parameter 'utmcc' - this holds the Google Analytic Cookie values (they weren't kidding when they said it was long):

HTTP:http://www.google-analytics.com/__utm.gif?utmwv=5.4.3&utms=4&utmn=1046933378&utmhn=www.deviantart.com&utme=8(user-type)9(visitor)11(1)&utmcs=windows-1252&utmsr=1600x900&utmvp=1583x754&utmsc=24-bit&utmul=en-us&utmje=0&utmfl=11.7%20r700&utmdt=deviantART%20%3A%20Log%20In&utmhid=1021688701&utmr=0&utmp=%2Fusers%2Fwrong-password%3Fusername%3DGuiltyAsSin%26ref%3Dhttp%25253A%25252F%25252Fwww.deviantart.com%25252F&utmht=1373048611329&utmac=UA-322734-1&utmcc=__utma%3D212885643.1758037532.1373048500.1373048500.1373048500.1%3B%2B__utmz%3D212885643.1373048500.1.1.utmcsr%3Dgoogle%7Cutmccn%3D(organic)%7Cutmcmd%3Dorganic%7Cutmctr%3D(not%2520provided)%3B&utmu=qR~

In addition to the utmcc parameter, there are up to 31(!) other parameters that this utm.gif value can hold.1

Some of these are:

Utmdt: Page Title
Utmhn: Host title
Utmp: page request
Utmr: referral with the complete URL
 
Other variables include the version of Flash used, screen resolution, screen color depth, and language encoding. To see the full list, check out this Google Developers page.

If looking at the above URL makes your eyes cross, here is what a manually parsed version looks
like:

utmhn (Host Title):             www.deviantart.com
utmdt (Page Title):            deviantART : Log In 
utmp (Page Request):      /users/wrong-password?username=GuiltyAsSin&ref=http%253A%252F%252Fwww.deviantart.com%252F

The utmcc parameter holds the Goggle Analytic cookie values. So manually parsing these values 2:

utma (First Visit ) =7/5/2013  6:21:40 PM
utma_(Previous)   =7/5/2013  6:21:40 PM
utma (Last Visit)   =7/5/2013  6:21:40 PM

utmcsr (souce site) = google
utmctr (keywords that found site) = not provided

(For a refresher on how to parse the GA cookie values see this article on DFI News , or my blog post here)

When I ran into these values on an exam and needed to parse a lot of them, I reached out to Cheeky4n6Monkey who wrote an awesome script to parse them. What is cool about his script is it works with various file formats. For example, it can parse the Safari SQLite cache.db and the Firefox __CACHE_ files.

Speaking of which, here are the locations for some different cache files holding these utm.gif? image requests:

Locations

FireFox
C:\Users\%USERNAME%\AppData\Local\Mozilla\Firefox\Profiles\%RANDOM%.default\Cache   

These utm.gif? values can be in the _CACHE_001_, _CACHE_002 etc files and the randomly named files in the sub-folders.

Chrome
    C:\Users\%USERNAME%\AppData\Local\Google\Chrome\User Data\Default\Cache
    data_1, data_2 etc files 

Safari
    Users\%USERNAME%\Library\Caches\com.apple.Safari\cache.db
       
Windows
    C:\Users\%USERNAME%\Local\Microsoft\Windows\WebCache\WebCacheV01.dat

So in the course of an exam, a quick way to locate and parse the GA GIF urls might be this:
  • Run a keyword search for “utm.gif?”
  • Filter by unique files
  • Export out the files into one directory
  • Use Gis4cookie.pl to parse the entire directory with the -p switch:
    Gis4cookie.pl –p /home/sanforensics/exported_files –o All_Cache_Entries.tsv
 Click, Parse, Boom. One worksheet with tons of information:


The script, Gis4Cookie.pl is still being perfected, so consider this a teaser, but rumor has it it will be out shortly. Make sure to keep an eye on Adrian's blog...

[Edit 7/17/2013] - Adrian's script in now available.

References:

1. https://developers.google.com/analytics/resources/concepts/gaConceptsTrackingOverview?hl=es-ES

2.https://developers.google.com/analytics/devguides/collection/gajs/cookie-usage?hl=en

MS Office Recent Docs Plist Parser

$
0
0
Recently a post came up at Forensic Focus regarding the timestamps in the com.microsoft.office.plist file. I had a case several months ago where I ran into the same situation - trying to determine the timestamp for the Access Date stored in this file.  I have been meaning to get around to writing about what I found,  so after I saw that post I thought I would get in gear and do it.

When opening documents in Office 2008 and 2010 ( not sure about other versions) on a Mac the user is presented with a dialog box for recent documents, called the Workbook Gallery.  As you can see by the screen shot below, the Recent Documents tracks  the File Name, Last Opened date and File Path of the recent documents:


This information is stored in the com.microsoft.office.plist file under the User's profile : /Users/%Username%/Library/Preferences/.

Some notes about the com.microsoft.office.plist files:
  • It can contain A LOT of entries. I found close to 1500 entries spanning 4 years. 
  • It can also have User Information such as name and email address
  • It has Volume names, so you can see if files were opened from an external drive, etc.
If you do not have a Mac, you can view this file with plist Editor for Windows from icopybot.com. Below is a screen shot of how the com.microsoft.office.plist file looks. There is an Access Date field and File Alias field which both appear to be Base64 encoded:


Sometimes using various tools to see how the information is presented is helpful. Since the plist file is from a Mac, my next choice was to look at the file natively on a Mac. There is a free Plist Editor included in XCode, which is a developer tool published by Apple.

Looking at this plist file through the Xcode Plist Editor shows the following:


Now the Access Date look familiar, Hex values - and the File Alias looks like it's in Hex too.

Time to view the data in a Hex viewer to see what’s going on:


Ah ha! File Paths, File names, and the timestamp information.

Now the trick – figuring out the timestamp. By doing some testing – I.E. opening up files in MS Office on a Mac, checking the changes in the timestamp values, and brainstorming with Brian Moran, we were able to figure out the timestamp appeared to be in HFS+ 32 Bit Little Endian:

B95120CE = Thu, 01 August 2013 10:56:09 -0700

We couldn’t quite figure out what the last two bytes, 0xEB6A, were for – maybe milliseconds? Further testing will need to be done to confirm this.

Time to time it all together. Take the Data Field from File Alias in the Mac Plist Editor and convert the Hex value to ASCII (try this website) to get your File Paths and File Name:

Hex:
00000000 01960002 00000a4d 44544855 4d424452 56000000 00000000 00000000 00000000 00000000 00004244 0001ffff ffff1645 6d706c6f 79656520 53616c61 72696573 2e786c73 78000000 00000000 00000000 00000000 00000000 00000000 00000000 00000000 00000000 00000000 0000ffff ffff0000 00000000 00000000 0000ffff ffff0000 0a024953 00000000 00000000 00000000 0018436f 6d70616e 7920546f 70205365 63726574 2046696c 65730002 00442f3a 566f6c75 6d65733a 4d445448 554d4244 52563a43 6f6d7061 6e792054 6f702053 65637265 74204669 6c65733a 456d706c 6f796565 2053616c 61726965 732e786c 7378000e 002e0016 0045006d 0070006c 006f0079 00650065 00200053 0061006c 00610072 00690065 0073002e 0078006c 00730078 000f0016 000a004d 00440054 00480055 004d0042 00440052 00560012 00302f43 6f6d7061 6e792054 6f702053 65637265 74204669 6c65732f 456d706c 6f796565 2053616c 61726965 732e786c 73780013 00132f56 6f6c756d 65732f4d 44544855 4d424452 5600ffff 0000

ASCII:
MDTHUMBDRV
Employee Salaries.xlsx
Company Top Secret Files
D/:Volumes:MDTHUMBDRV:Company Top Secret Files:Employee Salaries.xlsx
Employee Salaries.xlsx
MDTHUMBDRV
0/Company Top Secret Files/Employee Salaries.xlsx
/Volumes/MDTHUMBDRV
Mari DeGrazia


(In this example, the volume name of my thumbdrive was MDTHUMVDRV)

Then use Dcode (or whatever you like) to convert the Hex timestamp (remember to remove the last two Bytes):


If you do not have a Mac at your disposal, no worries, you can still use the Windows plist editor.

From the plist Editor for Windows, convert the Access Date from Base64 to Hex (try this website):
AAC5USDO62o=  =  0000B95120CEEB6A

Then use DCode to convert B95120CE as shown above.

For the File Alias, convert the Data field from Base64 to ASCII, try this website for the conversion.

Or go for door number two - you can use the python scrip I wrote, OfficePlistParser to parse the file.

The script will pull the MRU ID (so you can refer back to the plist for verification), Access Date in UTC, and Full Path. Long file names appear to be concatenated with with a random set of numbers, like so:

\long\path\to\my\long\file\name\Supercalifragilistic#6E432C.doc

In Office 2010, the long file names are supplied in the file aliases which are parsed by the script.

It also pulls User information which is output to the screen. A note on the User information. I noticed on some of my test data that the username in the file may be the person who first registered the product, or entered their user information into MS Word first. This did not correspond to the user who opened the file.

For example, on another Mac I created a profile for testing, opened a document then parsed the file. The owner's name was listed in the plist file, not mine or my account user name. Some more research will need to be done here.... If your looking at a carved plist files it's something to be aware of as the username may not be representative of who opened the files.

Since Python does not have native support for reading binary plist files, the library biplist is required. This can be installed on the SIFT workstation using easy install:

sudo easy_install biplist

Here is an example some parsed content:


You can get the scrip here. Enjoy, and any feedback/issues with the script are appreciated. It worked on my test data but I don't know what type of shenanigans your clients may be up to...

Also, quick shout outs to Cheeky4N6Monkey and @brianjmoran for their help. Three minds are better then one, right?

Safari Binary Cookies - Now with more parsing power!

$
0
0
  
Safari stores cookies in a file called Cookies.binarycookies under the location ~/Library/Cookies/Cookies.binarycookies. In earlier versions of Safari, cookies were stored in a plist file which could be easily read in a plist editor. However, the newer binarycookies file format - not so much.

Several people have already done a fantastic job of breaking down the file format and writing scripts to parse these cookies. If Perl is your flavor, check out these handy tools from Jake Cunningham. If you love Python, the script from Satishb3 does a great job of parsing the information.


While both of the above scripts do a fantastic job of parsing and presenting the information for the Cookies.binarycookies file, I wanted a way to parse a directory full of these binarycookies as well as the Google Analytic values from the cookies.

The awesome thing about open source is the ability to not only learn by looking at someone else's code, but to build on top of what they have done and create or tailor something for what you need (then hopefully turn around and share it again with others).


When I was reviewing the Satishb3 python script, I did not see a specific licensing agreement distributed with the code. I reached out to Satishb3 for permission to reuse his code and luckily for me, he graciously wrote back granting me permission.

This saved me a lot of time, and enabled me to focus my efforts on adding in the features that I needed. I sat down with some Dr. Pepper and the handy, dandy SIFT Workstation,and wrote a python script that parses the binarycookies file with the following additions:


1) Parses a directory full of cookies
2) Parses the Google Analytic values from the Cookies (umta, utmb, utmz)
3) Added an option to output into TLN format


 Usage Examples


To process one file:
 bc_parser.py  -f Cookies.binarycookies -o myoutput.tsv

To process a directory of cookies:
bc_parser -d /full/path/to/cookies -o myoutput.tsv
To have the output in TLN format (this can be used with the file or directory option):

bc_parser.py -f Cookies.binarycookies -o myoutput.tsv - t -H MariPC -u Mari
 -f is the binary cookie filename, -o is the output file,  -t means TLN output, -H is the Host (optional) and -u is the username (optional) .

Example Cookie Output: 

Full Image

Google Analytic Output, utmz:


Full Image

TLN (Timeline Output):

Full Image


Download the bc_parser python script.


Python Parser to Recover Deleted SQLite Database Data

$
0
0
Soooo.... last week I was listening to the Forenisc Lunch  and the topic of parsing deleted
records from SQLite databases came up. These Forensic Lunches are every Friday and cover a wide range of topics relevant to the Forensics Community and are hosted by David Cowen. I highly recommend participating in one if you get the chance. It's actually at 10am my time, so it's more like a Forensic Doughnut for me.

Anyways, back to the SQLite databases....I see a lot of these databases in my mobile phone exams. They can contain emails, text messages, app data and more. It's also not uncommon to run into them on Windows (and Mac) exams as well - think Google Chrome History which is stored in an SQLite database.

SQLite databases can store deleted data within the database itself. There are a couple of commercial tools that can parse this deleted data such as Oxygen Forensics SQLite Viewer.

While a commerical tool is good, its always nice to have an open source alternative. After hearing David mention in the webcast he was not aware of any open source tools that did this, my ears perked and I decided to try my hand at writing a Python script to parse SQLite databases for deleted data.

Luckily, the SQLite file format is nicely documented on the SQLite.org website. I won't go into much detail here as it's laid out very nicely on their website.

Basically the database consists of Pages. Some of these Pages are "leaf table b-trees" which contain the data. In turn, these leaf table b-trees contain cells. According to SQLite.org, SQLite "strives" to place the cell towards the end of the b-tree page (how does a program strive I wonder?).  Because the cells 'strives' to be towards the end  (I keep thinking of Happy Gilmore - Go home ball! Don't you want to be in your home?) the unallocated space is, in essence, the space before the first cell starts. This unallocated space can contain deleted data.

The leaf table b-tree page can also contain freeblocks. Freeblocks are areas of unallocated space tracked by the leaf table b-trees.  So there are two areas within a page that can contain deleted data: unalloacted and freeblocks.

In this example I am going to use the script to parse the Google Chrome History database.  In case you want to play along you can find this file under C:\Users\%USERNAME%\AppData\Local\Google\Chrome\User Data\Default (if you have Chrome installed).

Using the SIFT workstation I ran the script over the History file (by default the Chrome History file does not have a file extension):

sqlparse.py -f  /home/sanforensics/History -o report.tsv

 The output includes the Type (Allocated or Freeblock), Offset, Length and Data:


Now, an important note about the deleted data. In order to make the data readable, I have stripped tabs,white spaces and non-printable characters in the output.  As much as I love like looking at hex, it was drowning out the strings I was looking for.

You can also run the script in raw mode, which will dump the data field as is:

sqlparse.py -f mmssms.db -r -o report.txt

This can be helpful if you are looking for timestamps, flags or other data that may be in Hex.

Download the sqlparse.py script here. Tested on Python 2.6.4.

Carving for Cookies: Supersize your Internet History Timeline using Google Analytic Artifacts

$
0
0
Google Analytics information can include values such as timestamps, page titles, keywords and page referrers which can be located on a user's computer. These values can be located in Cookie files and Browser cache files.
Artwork by Cheeky4n6Monkey

A while ago I wrote a blog post about the Google Analytic Cookies and the Cache files. Rather then focus on how to parse these artifacts like previous posts, this post will dive into how you can use deleted Google Analytic artifacts to build a much more comprehensive timeline as well as how to recover them using Scalpel.

(Or you can watch me talk about it on the Forensic Lunch if you prefer, but I have more detailed instructions here)

Building out the Timeline

I had a case where the user account was deleted, and the client wanted Internet History recovered to show a pattern of activity - not just that the user had been to a site once, but many times over the course of the time they had access to the computer.

Although I tried two commercial tools to recover deleted Internet History, it was very little and over a short period of time. This is where Google Analytic artifacts stepped in and saved the day.  I was able to recover a large amount of cookies from unallocated space and cache files to build up a timeline that showed a pattern over time - much, much more then the Internet History I recovered with the commercial tools. Even if you are working with an existing user account, adding these artifacts can build out your timeline even more. I'll explain what I mean below.

Normally, when a cookie is viewed through a tool such as NetAnalysis, you are presented with a Last Visited Date, Hit Count and Domain name:


Take the cookie highlighted above in blue for an example. By looking at the displayed information  we know the host name, last time the domain was visited and how many hits it had. But what do the hits mean exactly?  Were all of these 136 hits done in one day? Were they spread out over the course of the year? What about all the days/visits prior, if any?

This is where the power of recovering deleted Google Analytic artifacts can help build out a timeline.  Take for example the _utma cookie. This cookie has three timestamps as opposed to the one timestamp of a "regular" cookie. After recovering some of these __utma cookies with the same host name, we can start to build up a timeline that has way more information. (The following spreadsheets were generated by using GA Cookie Cruncher to parse the recovered cookies)

Recovered __utma Cookies


The __utmb cookie stores session information for each visit to a website. It expires after 30 minutes of inactivity. This __utmb cookie not only stores the time of the session, but how many pages were viewed during that session. This means that if a user visits a website twice in one day, say before and after work,  two separate__utmb cookies would have been created. Once in the morning with a page count for that visit, and once in the evening with a new page count for that visit. Since the only the last cookie is saved, we would only have one count for the page views. If we recover the cookies that existed previously, we can see a session count for those previous visits and add those to the timeline:

Recovered __utmb Cookies

 The__utmz  cookie stores information related to how a user arrived at a website. Theses include keywords and the source. Once again, recovering these can show various ways a user arrived at a site:

Recovered __utmz Cookies


Now if we combine all cookies into one sheet for review:

All Recovered __utm Values


Look at all the information that is now available compared to viewing just the one existing cookie! Instead of being presented with one visit date and one hit count, we now have previous visits, keywords, referral pages and how many pages were viewed in each session. This can further be built upon by adding the __utm?gif cache values which can have over 30 other variables such as page title and referral page. I have also seen values like usernames in the cached URLs which could extremely helpful.

Recovering Deleted Cookies

The real power of the Google Analytic artifacts comes into play when deleted artifacts are recovered. By using Scalpel and then parsing the carved files you can have some new data to play with and analyze.

Based on some initial and limited testing with Internet Explorer 11 and Windows 7, it appears the browser deletes then creates a new cookie when visiting a website rather then overwriting the old cookie. This means there could be a lot of cookies waiting to be recovered.

Scalpel is a great program for recovering, or 'carving' for deleted files. It's a command line tool which is included in the Sift Workstation, or it can be downloaded from here.

By default, Scalpel does not carve for Google Analytic Cookies and cache files, but that is easily fixed by adding in a few lines to the Scalpel configuration file (mine was located under /user/local/etc/scalpel.config):

scalpel.config


I added five entries into the configuration file in order to locate Internet Explorer and Safari Binary Cookies and Cache files. (I'm still working on the best way to carve out then parse cookies that are stored in SQLite databases, such as Firefox and Chrome.)

If your unfamiliar with how to use Scalpel or need a refresher,Cheeky4n6Monkey has a great post on how to use Scalpel, including how to add custom carvers like these.

The configuration file itself has detailed instructions on how to add custom file types, but here is a quick explanation of the entries I've made.  The first column is the file extension. In this case it's arbitrary and you can use whatever you like here. For instance, I could have also used .txt instead of iec (which I chose to stand for Internet Explorer Cookie).

The second column is whether or not the header is case sensitive. In my test data for IE, I have always seen them in lowercase so I used 'yes' to help reduce false positives.

The third column is the max size for the file we are carving. Since each IE cookie should be relatively small, I have used 1000 bytes as the value.

For the header and footer, if we view the Internet Explorer Cookies in a text editor, we can see that each cookies starts with a __utm value and ends with a '*' - these will be the header and footer respectively for each carved cookie:


Safari Binary cookies have "cook" for a file header. Since one Safari Binary Cookie file holds all the cookies for the browser, the file size can be larger then the IE cookies. To be on the safe side I have specified a much larger file size of 1000000 bytes.  The footers on Safari Binary Cookie files are not always the same, so I have left this value blank.

The cache file store the __utm.gif? values in plain text.  The goal is not to recover the entire cache file, but just the __utm_gif? URL and values. Below is a picture of a Firefox cache file:


By using the string "google-analytics.com/__utm.gif?" as a header, and specifying 1000 bytes, it should extract the whole URL plus a little extra for padding to be safe. (To read more about the __utm.gif values in cache files, check out my blog post here.)

When Scalpel carves all these file types, they will each be dropped into their own sub directory automatically.

To run scalpel:
scalpel -c /usr/local/etc/scalpel.conf -o carvedcookies /cases/myimage.dd

Opening up each carved file and manually parsing it for all the _utm values could be pain, especially if you have hundreds of recovered files. To that end, I have updated GA Cookie Cruncher to handle carved cookies for Internet Explorer and Safari Binary Cookie Parser for Safari Binary Cookies.

What do I mean by "handle"?  When recovering files, sometimes the files are fragmented, incomplete or there may be some false positives.  For example, if you were to try and open an incomplete Word Document in Word, it might close and give you an error.  Both of the above programs can handle these situations. If the file is incomplete, it tries to get as much information as it can, then moves on to the next file.

(To that end, it worked on my test data. If it crashes on yours, shoot me an email and I'll see what I can do)

What this means is that once you carve the files, you just need to point the programs at the directories and let them parse as many values as they can.

So in summary, the following steps can be followed to recover and parse deleted Google Analytic values for Internet Explorer and Safari:

  • Update the Scalpel config file with the carvers
  • Run Scalpel over the image
  • For Internet Explorer, point GA Cookie Cruncher to the directory holding the IE recovered cookies
  • For Safari, run the Safari Binary Cookie parser with the directory option (-d) to the directory holding the recovered binary cookies.
  • For Cache records,point the Gis4Cookie parser with the directory option to the directory holding the recovered cache files
  • Analyze the generated spreadsheets and build out your timeline. 
(Side note - the entry made in the scalpel.config file for cache files also works for Chrome and Firefox, however I am still working on how to carve and process fragmented Chrome and Firefox Cookies as they are in a different format. Sqlite files are harder to recover in their entirety.)

There might be a few more steps involved then just pushing a button, but in my case is was worth it.


What's the Word - Thunderbird! - Parser that is....

$
0
0
Thunderbird is a free email client by Mozilla (similar to Outlook).  Most of the major Forensic tools support parsing this data in one way or another.  However, I recently came across a Thunderbird profile in a Volume Shadow Copy that was not getting parsed correctly, or in some instances, into a format that I needed it in.


What tipped me off that the profile was not being parsed correctly? Several things. One program I used parsed only 274 messages. Based upon the large size of the profile, this seemed suspect to me.  I tried another program and it parsed over 5,000 emails from the same profile. Quite a discrepancy. When I tried to view the profile natively using Thunderbird, it threw errors.

This caused me to take a closer look at the Thunderbird files, and untimely, write a python parser to extract the emails – including deleted ones.
  
Testing

Because the email profile was corrupted, I wanted to test the same programs with a "normal" profile. I actually use Thunderbird as my email client, so I had a decent profile for testing with over 7,000 emails in my Inbox and about 3,300 in my sent folder over the course of a couple of years.


I parsed my profile with three forensic programs as well as just viewing it in Thunderbird. I also ran the python script  I wrote over it (noted as TB Parser below). I was surprised by the variety of results - many programs were not getting all the messages. I've listed the major email folders from the Thunderbird profile below and the number of parsed emails from each program:


Tool 1 is a common "all in one" forensic tool. If you look at results from the Inbox, over 4,000 emails were parsed. If an examiner was using this as their only tool, it's easy to see how they might not even realize that an additional 3,000 messages were not parsed.

A possible reason for these discrepancy is the format in which Thunderbird stores its emails. Thunderbird uses a modified version of the MBOX email format, called MBOXRD1.This may account for the partial processing of emails as many of the tools support state support for MBOX. However, Tool 1 states in it's documentation specific support for Thunderbird.

So if the tools states support for Thunderbird, or if you see some emails but they are all not being parsed, is the tool to blame? I think it may be a little misleading that some of the emails are parsed, however,   I believe that it is incumbent upon the examiner to verify the results and understand the way that the tools work. However, that being said, sometimes it's easier said then done. I had a situation where it was pretty obvious all the emails had not been parsed. What if the profile size was 1GB and 5,000 emails were parsed? Is that a reasonable number? What if it was supposed to be 6,000 and your smoking gun is one on the ones that didn't get parsed?


Thunderbird Configuration

First, a little background information on Thunderbird. Thunderbird allows a user to set up both POP and IMAP email. Once a user has set up and configured their profile, it’s stored under the following location (at least on Windows 7):

C:\Users\%USERNAME%\AppData\Roaming\Thunderbird\Profiles\[Random].default

Unlike Outlook, the data is not stored in one file, but rather a series of files and folders under the profile directory. If you want to view this profile natively with Thunderbird, the easiest way I have found so far it to launch Thunderbird from the command prompt with the –profile switch and point it to the path where you have exported out the profile. Make sure you’re not connected to the Internet if your doing this on an evidence profile. The last thing you want to do is download new email or send out a message that has been sitting in the outbox. This may (and probably will)  modify the file, so only do it on a copy.


Once launched, a typical setup may look like this:


Of course, being forensicators, this may not be the preferred way to review emails - but sometimes it's nice or even necessary to see files in the native viewer/program.

A whole bunch of files are created under the root of the profile directory. These include files like cookies.sqlite, places.sqite and formhistory.sqlite that may warrant a peek. However, I am going to focus on the email files for now.

Email Files

Thunderbird stores the IMAP mail profile in a sub folder named "ImapMail" while POP mail and Local Folders are stored in a sub folder named "Mail":


There are several files that hold information related to emails. The first is the global-messages-db.sqlite file. This file is located in the root of the profile folder:


Global-messages.db.sqlite Database

The global-messages.db.sqlite is an SQLite database that Thunderbird uses to index and search messages.2 This file can be viewed using an SQLite Browser. The "mesagesText_Contents" table contains the Email Body, Subject, Author, Recipients and Attachment Names.

messagesText_Contents Table
While this database contains email information, the email body is not a true representation of the email. For example, the body field does not contain images or attachments. Also, it does not contain messages that have been deleted, whereas the MBOXRD file can (discussed below).  However, it does contain some useful data, such as the name of the attachments of non-deleted emails. You could browse this database quickly to see if any attachment names are suspicious. 

Using "docid" in the messagesText_Contents table, you can link it back to the “messages”table id field. The messages table contains information about each message, such as the headerMessageID and jsonAttributes. The jsonAttirbutes are what stores whether a message has been read, forwarded or replied to among other things.

 
The headerMessageID is also located in the MBOXRD file - which is what I used to link the raw MBOXRD data back to global-messages.db.sqlite database. You may noticed there is a deleted column here. Based upon limited testing, I believe that this value is used during the synching of the IMAP mail. When a message is deleted, it remains in this database with a 1 until the corresponding message is deleted on the mail sever. Once it has been deleted, the message is removed from the database, but remains in the MBOXRD file. Normally all these values will be '0' unless the user was offline when the message was deleted.


In my particular case, this sqlite file was corrupt and I did not have access to these tables.  This may also be why one of the programs did not parse the email fully - maybe it was relying on the table, who knows.  I have written my parser so that it does not need this database to process the emails. It merely displays "Data not available" for the fields that it can't pull from the table.

Just a heads up, there is more data that could be mined from this database, such as IM Conversations but I am trying to stay focused on email.. so moving on.... (and who uses Thunderbird to IM anyways????)

MBOXRD aka The Payload

Thunderbird stores email in an mbox  format called MBOXRD. Basically, it stores email in plain text MIME format. The cool thing is (based upon my testing and some internet research) when an email is deleted, it stays in this file. These deleted emails would not be seen if this profile was viewed using the Thunderbird client. The thunderbird parser pulls all the emails from these files, including deleted ones.

The MBOXRD files are stored in file that is named after the corresponding email folder with no file extension. For example, the Inbox folder stores its emails in the "INBOX" file":


One level deeper, in the .sdb folder are the other folders such as the Sent folder and any user created folders to store email:


.MSF files
 For each MBOXRD file, there is a corresponding .msf file. The .msf file contains folder indexes and preference data in Mork format. According to internet research, this file format has taken a lot of heat as being a pain to work with. The pointers for messages marked as Junk by Thunderbird appear to be tracked in here (based upon my limited testing). However, the formatting of the Message-ID's in this file are whacked. They include backslashes and if they are to long, they can also include the newline "\n" character as well.

Deleted Files
As mentioned before, when a file is deleted it is removed from the database yet still remains in the MBOXRD file.  In order to determine if a file is deleted,  the headerMessageID in the MBOXRD file can be cross referenced back to the database. However, emails that have been marked as "Junk" mail by Thunderbird are not stored in the global-messages.db.sqlite either. The "Junk" emails appear to be stored in the corresponding MBOXRD .msf file. So two checks need to be done to determine if a file has been deleted. The logic is as follows:


Thunderbird Email Parser

The python thunderbird email parser does three things:

1) Provides an Excel Sheet with the following information: file the email came from, address information (from, to, cc, bc), subject, raw date, converted date (in UTC) a link to the exported email and a list of attachments:


2) If the corresponding global-messages.db.sqlite is readable, it will provide TRUE/FALSE values for read, replied forwarded and if the message was deleted. If a message was deleted, the database format has changed, or the database is corrupt, these fields will say "Data not available".


3) It exports all the emails into a subfolder named "emails". Each email is named with the timestamp, email subject and unique number.


Normally, when I write a parser, I like to dump the output into a CSV, TSV or a plain text file.  This proved difficult for two main reasons. 

First, many of the email addresses and strings within the email body contained tabs and commas which threw the formatting off.

Second,   I needed a way to supply the body of the email. Putting a large body of an email into one cell looked ugly.  Also, html was not displayed as one would see it in an email client making it difficult to read.

For this reason, I decided to put the output into an Excel sheet. So in order to use the parser, the xlwt python libary needs to be installed which is pretty quick and easy to do for either the Windows or Linux platform. For Linux, you can use easy install. For Windows, you can downalod the installer for xlwt at https://pypi.python.org/pypi/xlwt/0.7.2

To use the parser, simply point it at the profile directory and select a directory for the output. The script will recurse through all subdirectories, so if you export out the user profile, make sure it goes in it’s own directory:


A report.xls file will be created along with a log file in output folder. The .eml files will be placed in a subdirectory named “emails”.

Some things to note, you may notice duplicate emails. This is because some emails may be stored in several folders, thus the email is stored in multiple files.  For example, an email may be in the Inbox, as well as the All Email folder.  Why not remove duplicate emails?  Well, there may be significance if you find an email has been stored in a particular folder.

I am using a built in MIME python library to parse the emails. If an email does not follow this standard, the output may not be as expected -weird characters, etc. This is why I put the file name in the Excel sheet. You can always refer back to the original MBOXRD file to verify the results.

Although I have made every effort to test this script, and to make sure it is working accurately, verify your own results - which you should be doing anyways, right? ;-)

For deleted emails, I have made the notation "Deleted (Verify)". I did this because there is not a specific flag or variable to designate that the email has been deleted. I run through several checks to located the Message-ID to determine if the file has been deleted.  It seems to be working pretty good, but I have a limited set of test data.  How can you verify if the message has been deleted?  One way would be to open the profile in Thunderbird and use Thunderbird to search for the email. If the user deleted the email, it would not show up in Thunderbird.

I have tested this on Thunderbird 24.4.0 using Windows 7 and the SIFT workstation with Python 2.7.  If you want a Python 3+ version, I like shiny things and K-cup hot chocolate.

Given the frequency Mozilla tends to update things, there is always a chance that a new version may break the code. If you run into a situation where it doesn't work on a new or older version of Thunderbird, shoot me an email and I'll see what I can do.

As always, feedback and suggestions are welcome (If you're nice about it. Otherwise it goes right in the spam folder).

Download Thunderbird email parser.

References:

 1. Library of Congress "Sustainability of Digital Formats Planning for Library of Congress Collections, MOBXRD Email Format."

2. Mozilla Foundation. "Rebuilding the Global Database"

Safari and iPhone Internet History Parser

$
0
0
Back in June, I had the opportunity to speak at the SANS DFIR Summit.  One of the great things about this conference was the ability to meet and socialize with all the attendees and presenters. While I was there, I had a chance to catch up with Sarah Edwards who teaches the Mac 518 class for SANS.

I'm always looking for new projects to work on, and she suggested a script to parse Safari Internet History. So the 4th of July long weekend rolled around and I had some spare time to devote to a project. In between the fireworks and a couple of Netflix shows (OK, maybe 10 shows), I put together a python script that parses out several plist files related to Safari Internet History: History.plist, Bookmarks.plist, TopSites.plist and Downloads.plist.

Since the iPhone also uses Safari, I decided to expand the script to parse some iPhone Safari artifacts: History.plist, Bookmarks.db and RecentSearches.plist. I imagine the iPad also contains Safari Internet History, but I did not have one at my disposal to test. If you want to send one to me for testing, I would be happy to take it off your hands :-).

In this post I'll run through each of the artifacts I located and explain how to use the script to parse out the files.

Plist Files: A love/hate relationship

First, a little background on plist files. Plist files are awesome because they can contain all sorts of information such as Internet History, Recent Docs, Network IDs etc.  There are free tools for both Windows and OS X that will allow you view the data stored in the plist file. For Windows, you can use plist Editor.  If you have a Mac, a free plist editor is included in Apple's XCode Developer Tools which can be downloaded through the App Store.

However, plist files also stink because while the plist format is standardized, it's entirely up to the programmer to store whateverthey want, in whatever format they want.

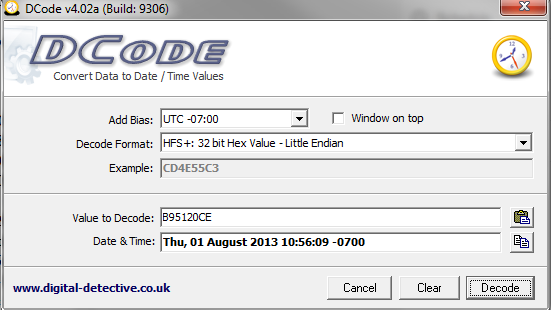
A (frustrating) example of this is date information. In the Safari History.plist file the date is defined as a "String", and is stored in Mac Absolute time. Mac Absolute time is the number of seconds since June January 1, 2001.  Below is an example of this from a Safari History.plist file viewed in the XCode plist editor:

History.plist file in XCode plist editor
In the Safari Bookmarks.plist file, the date is stored in a field defined as "Date".The date is stored in a more standard format:

Bookmarks.plist file in XCode plist editor
This means that each plist file needs to reviewed manually to determine what format the data is in, and how it's stored before it can be parsed.

So, moving on to the artifacts...
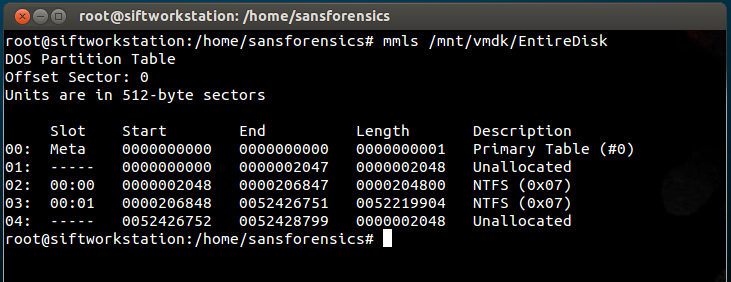
Where's the beef?

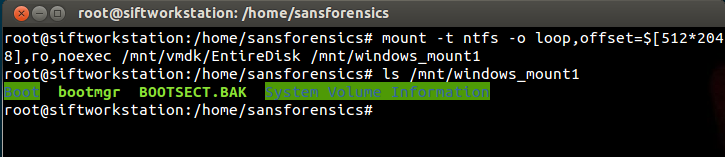
On a Mac OS X, the Safari Internet History is located under the folder /Users/%USERNAME%/Library/Safari. As I mentioned before, I located four plist files in this folder containing Internet History: History.plist, Bookmarks.plist, TopSites.plist and Downloads.plist. I've written the script to read either an individual file, or the entire folder at once.

(If you're wondering about the Safari cookie files, I already wrote a separate tool support these, which can be found on my downloads page.)

History.plist
This file contains the the last visited date, URL, page title and visit count. To run the parser over this file and get a tsv file use the following syntax:

safari_parser.py --history -f  history.plist -o history-results.tsv

TopSites.plist
The Top Site feature of Safari identifies 12 Top Sites based upon how often and how recent the sites were visited. There are several ways to view the tops sites in Safari, such as starting a new tab or selecting it from the Menu>View>Top Sites. Small thumbnails of each Top Site are displayed. The user has the option to Pin or Delete a site from the Top Sites. Pinning a site keeps it in the Top Sites List, while deleting it removes it. The list can be increased to hold up to 24 sites.

The thumbnails for the webpage previews for Safari can be found under /Users/%Username%/Library/Caches/com.apple.Safari. Below is how the TopSites appear to a user ( this may vary depending on the browser version):


The TopSite.plist file contains the Page Title and URL.  It also stores values to indicate if it's a Pinned or Built in Site. Built in Sites are pre-populated sites such as iCloud or the Apple Website.

TopSites that have been deleted are tracked in the TopSites.plist as "BannedURLStrings".

To parse the TopSites.plist file use the following syntax:

safari_parser.py --topsites -f  TopSites.plist -o topsite-results.tsv

Downloads.plist
Downloads are stored in the Downloads.plist file. When a file is downloaded, an entry is made containing the following: 1)Download URL; 2)File name including the path where it was downloaded to; 3)Size of the file; 4)Number of bytes downloaded so far.  The user may clear this list at anytime by selecting "Clear" from the Downloads dialog box:


To parse the Downloads.plist file use the following syntax:

safari_parser.py --downloads -f  Downloads.plist -o download-results.tsv

Bookmarks.plist
Safari tracks three different types of bookmarks in the Bookmarks.plist file: Favorites, Bookmarks and the Reading List.

Favorites
The Bookmarks Bar (aka Favorites) is located at the top of the browser:


The Favorites are also displayed on the side bar:


Bookmark Menu
A folder titled "Bookmark Menu" is created by default when a user creates bookmarks. It contains a hierarchical structure of bookmarks and folders - these are shown in the red box below:


The user may add folders, as demonstrated with the "test bookmarks" folder below:


Reading List
The Reading List is another type of bookmark. According to Safari documentation, "Reading List helps you save webpages and links for you to read later, even when you are not connected to the internet". These items show up when the user selects the Reading List icon:


Safari downloads and stores information such as cached pages related to the Reading List under  /Users/%USERNAME%/Library/Safari/ReadingListArchives. I didn't spend too much time researching this as my parser is focused on the bookmarks.plist file, but keep it in mind as it may turn up some interesting stuff.

All three types of bookmarks (Favorites, Bookmarks and Reading Lists) are stored in the Bookmarks.plist file.

The Bookmarks.plist file tracks the Page Title and URL for the Favorites and the Bookmarks, however, the Reading List entries contain a little bit more information. The Reading Lists also contains a date added, date last fetched, fetch result, and preview text.  There are also a couple of boolean entries, Added Locally and Archived on Disk.

Out of all the plist files mentioned so far, I think this one looks the most confusing in the plist editor programs.  The parent/child relationships of the folders and sub folders can get pretty messy:


To parse the Bookmarks.plist file, use the following syntax:

safari_parser.py --bookmarks -f Bookmarks.plist -o bookmark-results.tsv

The Safari Parser will output this into a spreadsheet with the folder structure rebuilt, which is hopefully more intuitive then viewing in the plist editor:


All Four One and One for All
Instead of parsing each file individually, all four files can be parsed by pointing Safari Parser to a folder containing all four files.  This means you can export out the /Users/%Username%/Library/Safari folder and point the script at it. You could also mount the image and point it to the mounted folder. To parse the folder, use the following syntax:

safari_parser.py -d /Users/maridegrazia/Library/Safari -o /Cases/InternetHistory/Reports

This will create four tsv files with results from each of the above Internet History Files.


iPhone Internet History

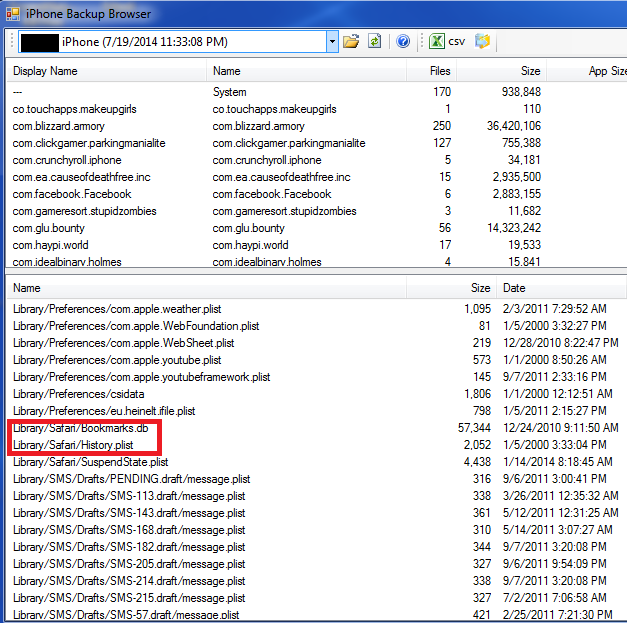
Safari is also installed on the iPhone so I figured while I was at it I might as well expand the script to handle the iPhone Internet History files. I had some test data laying around, and  I was able to locate three files of interest: History.plist, Bookmarks.db and RecentSearches.plist.

While my test data came from an iPhone extraction, these types of files are also located in an iTunes backup on a computer. This means that even if you don't have access to the phone, you could get still get the Internet History. Check in the user's folder under \AppData\Roaming\Apple Computer\MobileSync\Backup, then use a tool like iphonebackupbrowser to browse the backups and export out the files:


History
The location of the History.plist file may vary depending on the model of the iPhone. Check \private\var\mobile\Library\Safari or \data\mobile\Library\Safari for this file.

Luckily, the History.plist file has the same format as the OS X version, so using the script to parse the iPhone History.plist file works the same:

safari_parser.py --history -f  history.plist -o history-results.tsv

Bookmarks
The location of the Bookmarks.db file may vary depending on the model of the iPhone. Check \private\var\mobile\Library\Safari or \data\mobile\Library\Safari for this file. On an iPhone, this file is stored in an SQLite database rather then the plist format used on OS X.  In the test data I had, I did not see any entries for the Reading List. To parse the iPhone Bookmarks.db file, use the following syntax:

safari_parser.py --iPhonebookmarks -f bookmarks.db -o bookmark-results.tsv

Recent Searches
I located a RecentSearches.plist file under the cache folder. The location of this file may vary depending on the model of the iPhone. Check \private\var\mobile\Library\Caches\Safari or \data\mobile\Library\Caches\Safari. This file contained a list of recent searches, about 20 or so. Use the following syntax to parse this file:

safari_parser.py --iPhonerecentsearches -f recentsearches.plist -o recentsearches-results.tsv

You can also point the script to a directory with all three files and parse them at once:

safari_parser.py -d /Users/maridegrazia/iPhoneFiles -o /Cases/InternetHistory/Reports

The Script

The Safari Parser can be download here. It requires the biplist library which is super easy to install (directions below). However, I've also included a complied .exe file for Windows if you don't want to hassle with installing the library. A thank you  to Harlan Carvey for suggesting the PyInstaller to compile Windows binaries for python - it worked like a charm.

To install biplist in Linux just type the following:

sudo easy_install biplist

For Windows, if you don't already have it installed, you'll need to grab the easy install utility which is included in the setup tools from python.org. The setup tools will place easy_install.exe into your Python directory in the Scripts folder. Change into this directory and run:

easy_install.exe biplist

Remember to look at the plist files to manually to verify your results. I don't have access to every past or future version of Safari or iOS. As always, just shoot me an email or tweet if you need some modifications made.

References and Tools

safari_parser.py (my script to parse the Safari Internet History)
Safari 5.1 (OS X Lion): View and customize Top Sites
Plist Editor (free plist editor for Windows)
XCode (includes free Plist Editor for OS X)
iphonebackupbrowser ( free iTunes backup browser)


SQLite Deleted Data Parser - GUI Added

$
0
0
Last year I wrote a Python script to parse deleted data from SQLite Databases (original post here).
Every once in a while, I get emails asking for help on how to use the SQLite Parser from users who are not that familiar with using Python or command line tools in general.

As an everyday user of command line tools and  Python, I forget the little things that may challenge these users (we were all there at one point and time!) This includes things like quotes around file paths, which direction slashes go, and how to execute a python script if Python is not in your environment variable.

So, to that end, I have created a Windows GUI for the SQLite Parser to make the process a little less painful.

The GUI is pretty self explanatory:
  • Choose the path to the SQLite database
  • Choose the file to save the results to
  • Select Formatted or Raw output

This means there are now three flavors of the SQLParser available:
  • sqlparse.py - python script
  • sqlparse_CLI.exe - Windows command line tool
  • sqlparse_GUI.exe - Windows GUI tool
All three files are available for download here on on my GitHub page.

Coming soon... a blog post/tutorial on how to use python scripts :-)

Timestomp MFT Shenanigans

$
0
0

I was working a case a while back and I came across some malware that had time stomping capabilities. There have been numerous posts written on how to use the MFT as a means to determine if time stomping has occurred, so I won't go into too much detail here.

Time Stomping


Time Stomping is an Anti-Forensics technique. Many times, knowing when malware arrived on a system is a question that needs to be answered. If the timestamps of the malware has been changed, ie, time stomped, this can make it difficult to identify a suspicious file as well as answer the question, "When".

Basically there are two "sets" of timestamps that are tracked in the MFT. These two "sets" are the $STANDARD_INFORMATION and $FILE_NAME. Both of these track 4 timestamps each - Modified, Access, Created and Born. Or if you prefer - Created, Last Written, Accessed and Entry Modified (To-mato, Ta-mato). The $STANDARD_INFORMATION timestamps are the ones normally viewed in Windows Explorer as well as most forensic tools.

Most time stomping tools only change the  $STANDARD_INFORMATION set. This means that by using tools that display both the $STANDARD_INFORMATION and $FILE_NAME attributes, you can compare the two sets to determine if a file may have been time stomped.  If the $STANDARD_INFORMATION predates the $FILE_NAME, it is a possible red flag (example to follow).

In my particular case, by reviewing the suspicious file's $STANDARD_INFORMATION and $FILE_NAME attributes, it was relatively easy to see that there was a mismatch, and thus, combined with other indicators, that time stomping had occurred. Below is an example of what a typical malware time stomped file looked like. As you can see, the $STANDARD_INFORMATION highlighted in redpredates the $FILE_NAME dates (test data was used for demonstrative purposes)


System A \test\malware.exe

$STANDARD_INFORMATION
M: Fri Jan  1 07:08:15 2010 Z
A: Tue Oct  7 06:19:23 2014 Z
C: Tue Oct  7 06:19:23 2014 Z
B: Fri Jan  1 07:08:15 2010 Z

$FILE_NAME
M: Thu Oct  2 05:41:56 2014 Z
A: Thu Oct  2 05:41:56 2014 Z
C: Thu Oct  2 05:41:56 2014 Z
B: Thu Oct  2 05:41:56 2014 Z

However, on a couple of systems there were a few outliers where the time stomped malware $STANDARD_INFORMATION and $FILE_NAME modified and born dates matched:

System B \test\malware.exe

$STANDARD_INFORMATION
M: Fri Jan  1 07:08:15 2010 Z
A: Tue Oct  7 06:19:23 2014 Z
C: Tue Oct  7 06:19:23 2014 Z
B: Fri Jan  1 07:08:15 2010 Z

$FILE_NAME
M: Fri Jan  1 07:08:15 2010 Z
A: Thu Oct  2 05:41:56 2014 Z
C: Thu Oct  2 05:41:56 2014 Z
B: Fri Jan  1 07:08:15 2010 Z

Due to other indicators, it was pretty clear that these files were time stomped, however, I was curious to know what may have caused these dates to match, while all the others did not. In effect, it appeared that that Modified and Born dates were time stomped in both the $SI and $FN timestamps, however this was not the MO in all the other instances.

Luckily, I remembered a blog post written by Harlan Carvey where he ran various file system operations and reported the MFT and USN change journal output for these tests. I remembered that during one of his tests, some dates had been copied from the $STANDARD_INFORMATION into the $FILE_NAME attributesA quick review of his blog post revealed the following had occurred during a rename operation . Below is a quote from Harlan's post:

"I honestly have no idea why the last accessed (A) and creation (B) dates from the $STANDARD_INFORMATION attribute would be copied into the corresponding time stamps of the $FILE_NAME attribute for a rename operation"

In my particular case it was not the accessed date and creation dates (B) that appeared to have been copied, but the modified and creation dates (B). Shoot.. not the same results as Harlan's test... but his system was Windows 7, and the system I was examining was Windows XP.  Because my system was different, I decided to follow the procedure Harlan used and do some testing on a Windows XP to see what happened when I did a file rename.

Testing


My test system was Widows XP Pro SP3 in a Virtual Box VM.  I used FTK Imager to load up the vmdk file after each test and export out the MFT record. I then parsed the MFT record with Harlan Carvey's mft.exe.

First, I created "New Text Document.txt" under My Documents. As expected, all the timestamps in both the $STANDARD_INFORMATION and$FILE_NAMEwere the same:

12591      FILE Seq: 1    Link: 2    0x38 4     Flags: 1  
[FILE]
.\Documents and Settings\Mari\My Documents\New Text Document.txt
    M: Thu Oct  2 23:22:05 2014 Z
    A: Thu Oct  2 23:22:05 2014 Z
    C: Thu Oct  2 23:22:05 2014 Z
    B: Thu Oct  2 23:22:05 2014 Z
  FN: NEWTEX~1.TXT  Parent Ref: 10469  Parent Seq: 1
    M: Thu Oct  2 23:22:05 2014 Z
    A: Thu Oct  2 23:22:05 2014 Z
    C: Thu Oct  2 23:22:05 2014 Z
    B: Thu Oct  2 23:22:05 2014 Z
  FN: New Text Document.txt  Parent Ref: 10469  Parent Seq: 1
    M: Thu Oct  2 23:22:05 2014 Z
    A: Thu Oct  2 23:22:05 2014 Z
    C: Thu Oct  2 23:22:05 2014 Z
    B: Thu Oct  2 23:22:05 2014 Z
[RESIDENT]


Next, I used the program SetMACE to change the $STANDARD_INFORMATION timestamps to "2010:07:29:03:30:45:789:1234" . As expected, the $STANDARD_INFORMATION changed, while the $FILE_NAME stayed the same. Once again,  this is common to see in files that have been time stomped:

12591      FILE Seq: 1    Link: 2    0x38 4     Flags: 1  
[FILE]
.\Documents and Settings\Mari\My Documents\New Text Document.txt
    M: Wed Jul 29 03:30:45 2010 Z
    A: Wed Jul 29 03:30:45 2010 Z
    C: Wed Jul 29 03:30:45 2010 Z
    B: Wed Jul 29 03:30:45 2010 Z

  FN: NEWTEX~1.TXT  Parent Ref: 10469  Parent Seq: 1
    M: Thu Oct  2 23:22:05 2014 Z
    A: Thu Oct  2 23:22:05 2014 Z
    C: Thu Oct  2 23:22:05 2014 Z
    B: Thu Oct  2 23:22:05 2014 Z
  FN: New Text Document.txt  Parent Ref: 10469  Parent Seq: 1
    M: Thu Oct  2 23:22:05 2014 Z
    A: Thu Oct  2 23:22:05 2014 Z
    C: Thu Oct  2 23:22:05 2014 Z
    B: Thu Oct  2 23:22:05 2014 Z

Next, I used the rename command via the command prompt to rename the file from New Text Document.txt to "Renamed Text Document.txt" (I know - creative naming). The interesting thing here is, unlike the Windows 7 test where two dates were copied over, all four dates were copied over from the original files $STANDARD_INFORMATION into the $FILE_NAME:

12591      FILE Seq: 1    Link: 2    0x38 6     Flags: 1  
[FILE]
.\Documents and Settings\Mari\My Documents\Renamed Text Document.txt
    M: Wed Jul 29 03:30:45 2010 Z
    A: Wed Jul 29 03:30:45 2010 Z
    C: Thu Oct  2 23:38:36 2014 Z
    B: Wed Jul 29 03:30:45 2010 Z
  FN: RENAME~1.TXT  Parent Ref: 10469  Parent Seq: 1
    M: Wed Jul 29 03:30:45 2010 Z
    A: Wed Jul 29 03:30:45 2010 Z
    C: Wed Jul 29 03:30:45 2010 Z
    B: Wed Jul 29 03:30:45 2010 Z

  FN: Renamed Text Document.txt  Parent Ref: 10469  Parent Seq: 1
    M: Wed Jul 29 03:30:45 2010 Z
    A: Wed Jul 29 03:30:45 2010 Z
    C: Wed Jul 29 03:30:45 2010 Z
    B: Wed Jul 29 03:30:45 2010 Z


Based upon my testing, a rename could have caused the 2010 dates to be the same in both the $SI and $FN attributes in my outliers. This scenario "in the wild" makes sense...the malware is dropped on the system, time stomped, then renamed to a file name that is less conspicuous on the system. This sequence of events on a Windows XP system may make it difficult to use the MFT analysis alone to identify time stomping.

So what if you run across a file where you suspect this may be the case? On Windows XP you could check the restore points change.log files. These files track changes such as file creations and renames. Once again, Mr. HC has a perl script that parses these change log files, lscl.pl. If you see a file creation and a rename, you can use the restore point as a guideline to when the file was created and renamed on the system.

You could also parse the USN change journal to see if and when the suspected file had been created and renamed. Tools such as Triforce or Harlan's usnj.pl do a great job.

If the change.log file and and journal file do not go back far enough, checking the compile date of the suspicious file with program like CFF Explorer may also help shed some light. If a program has a compile date years after the born date,.. red flag.

I don't think anything I've found is ground breaking or new. In fact,the Forensics Wiki entry on timestomp demonstrates this behavior with time stomping and moved files, but I thought I would share anyways.

Happy hunting, and may the odds be ever in your favor...


USN Journal: Where have you been all my life

$
0
0

One of the goals of IR engagements is to locate the initial infection vector and/or patient zero. In order to determine this, timeline analysis becomes critical, as does determining when the  malware was created and/or executed on a system.

This file create time may become extremely critical if you're dealing with multiple or even hundreds of systems and trying to determine when and where the malware first made its way into the environment.

But what happens when the malware has already been remediated  by a Systems Administrator, deleted by an attacker, or new AV signatures are being pushed out, resulting in the malware being removed?

Many of the residual artifacts demonstrate execution,  however, it seems very few actually document when the file was created on the system. This is where the USN Journal recently helped me on a case. The USN Journal is by no means new.. but I just wanted to talk about a case study and share my experience with it, as I feel it's an often overlooked artifact.

For purposes of demonstrative data, I downloaded and infected a Windows 7 VM with malware.  This malware was from a phishing email that contained a zip file, voice#5734223.zip. This zip file contained a payload, voice.exe. For more details on this malware sample, check out http://malware-traffic-analysis.net/2015/01/27/index.html
 
So lets run through some typical artifacts that demonstrate execution along with the available timestamps and see what they do and don't tell us...

MFT
The MFT contains the filesystem information - Modified, Accessed and Created dates, file size etc. However, a deleted file's MFT record may be overwritten. If you're lucky, your deleted malware file will still have an entry in the MFT - however, in my case this was not to be.

The ShimCache
I won't go into to much detail here as Mandiant has a great white paper on this artifact. Basically, on most systems this artifact contains information on files that have been executed including path, file size and last modified date. I parsed this registry key with RegRipper, and located an entry for the test malware, voice.exe:

C:\Users\user1\Downloads\voice#5734223\voice.exe
ModTime: Wed Jan 28 15:28:46 2015 Z
Executed

So what does this tell me? That voice.exe was in the Downloads path, was executed, and has a last modified date of 01/28/2015 - <sigh> no create date </sigh>.
 
UserAssist
The User Assist is another awesome key... it displays the last time a file was executed, along with a run count. Once again, using RegRipper to parse this I located an entry for the test malware:

{CEBFF5CD-ACE2-4F4F-9178-9926F41749EA}
Mon Feb 23 02:33:34 2015 Z C:\Users\user1\Downloads\voice#5734223\voice.exe (2)*

By looking at this artifact, I can see that the file was executed twice - once on February 23rd, however, I don't know when the first time was. It could have been minutes, hours or days earlier. It still does very little to let me know when the file was created on the system, although I do know it should be sometime before this time stamp.

Prefetch File
This is a great artifact that can show execution and even multiple times of execution. But what if the system is a Server, where prefetching may not be enabled?  In my case, prefetching was enabled, but there was no prefetch file for the malware in question - at least that is what I thought until I checked the USN Journal. And, once again, it does not contain information related to when the file was created on the system.

Ok, so I've reviewed a couple of typical artifacts that demonstrated that themalware executed (for more artifacts related to execution, check out this blog post by Mandiant "Did it Execute") With timeline analysis, I may even get an idea of when this file was most likely introduced on the system - however, a definitive create date would be nice to have. This brings me too.....the USN Journal.

USN Journal
There are a couple of tools I use to parse the USN Journal. A quick, easy to use script is usnj.pl available from Harlan Carvey's GitHub page.

Parsing the USN Journal and looking for the malware in question, I see some interesting entries for voice.exe, highlighted in red below:


Sweeet! I now have a File_Create timestamp for voice.exe I can use in my timeline. I can also see that voice.exe was deleted relatively quickly ~ 30 seconds after it was created. This deletion occured about the same time when the prefetch file for it was created. This might be an indication that the malware deleted itself upon execution.

It's also interesting to note that around the same time the prefetch file was created for voice.exe, a file called testmem.exe was created and executed (highlighted in yellow)..hmmmm.

Time to dig deeper. For a little more detail on the USN Journal, there is the TriForce tool. This tool processes three files: $MFT, $J and $Logfile. It then cross references these three files to build out some additional relationships. In my experience, this tool takes a bit longer to run. As you can see by the output below, I now have full file paths that may help add a little more context:


That testmem.exe just became all that more suspicious due to it's location - a temp folder.

By reviewing the USN Journal file, I was able to establish a create date of the malware. This create date located in the USN Journal gave me an additional pivot point to work with. This pivot point lead to some additional findings -  a suspicious file, testmem.exe. (For some more on timelinepivoting, check out Harlan's post here). Not only did the create date help locate additional artifacts, but it can also help me home in on which systems may be patient zero. Malware may arrive on a system long before its executed.
 
Just because it's not there - doesn't mean it didn't exist. For the case I was working, I did not have any existing prefetch files for the malware. However, when I parsed the USN Journal, I saw the prefetch file for the malware get created and deleted within the span of 40 minutes. I also saw some additional temporary files get created and deleted, some of which were not in the MFT.

Alass, as sad as it is, my relationship with the USN Journal does have some shortcomings (and it's not my fault). Since it is a log file, it does "roll over" The USJ Journal can be limited in the amount of data that it holds - sometimes it seems all I see in it are Windows Update files. If a system is heavily used, and if the file was deleted months ago, it may no longer be in the USN Journal. However, all is not lost though, Rumor has it that there may be some USN Journal files located in the Volume Shadow Copies so there may still be hope. Also, David Cowen points out the log file is not circular (as I once thought), and just frees the old pages to disk:

"After talking to Troy Larson though I now understand that this behavior is due to the fact that the journal is not circular but rather pages are allocated and deallocated as the journal grows"

This means that you can carve USN Journals records! Check out his blog post here for more information.

Happy Hunting!

Additional reading on the USN Journal

http://journeyintoir.blogspot.com/2013/01/re-introducing-usnjrnl.html

http://forensicsfromthesausagefactory.blogspot.com/2010/08/usn-change-journal.html

https://msdn.microsoft.com/en-us/library/windows/desktop/aa363798%28v=vs.85%29.aspx

*The run count number was modified from 1 to 2 on this output to illustrate a point.


Dealing with compressed vmdk files

$
0
0

Wherever I get vmdk files, I take a deep breath and wonder what issues might pop up with them. I recently received some vmkd files and when I viewed one of these in FTK Imager (and some other mainstream forensic tools), it showed up as the dreaded "unrecognized file system".

To verify that I had not received some corrupted files, I used the VMWares disk utility to check the partitions in the vmdk file. This tool showed two volumes, so it appeared the vmdk file was not corrupted:


When I tired to mount the vmdk file using vmware-mount, the drive mounted, but was not accessible. A review of their documentation, specifically the limitation section, pointed out that the utility could not mount compressed vmdk files:

You cannot mount a virtual disk if any of its files are encrypted, compressed, or have read-only permissions. Change these attributes before mounting the virtual disk

Bummer. It appeared I had some compressed vmdk files.

So after some Googling and research, I found a couple different ways to deal with these compressed vmdk files - at least until they are supported by the mainstream forensic tools. The first way involves converting the vmdk file, and the second way is by mounting it in Linux.

Which method I choose ultimately depend on my end goals. If I want to bring the file into one of the mainstream forensics tools, converting it into another format may work the best. If  I want to save disk space, time and do some batch processing, mounting it in Linux may be ideal.

One of the first things I do when I get an image is create a mini-timeline using fls and some of Harlan's tools. Mounting the image in Linux enables me to run these tools without the additional overhead of converting the file first.

Method 1: "Convert"

The first method is to "convert" the vmdk file.
I'm using "quotes" because my preferred method is to "convert" it right back to the vmdk file format, which in essence, decompresses it.

The vmdk file format is usually much smaller then the raw/dd image and appears to take less time time to "convert".

I used the the free VBoxManger.exe that comes with VirtualBox. This is a command line tool located under C:\Program Files\Oracle\VirtualBox. This tool give you the option to convert the compressed vmdk (or a regular vmkd) into several formats: VHD, VDI, VMDK and Raw. The syntax is:

VboxManage.exe clonehd "C:\path\to\compressed.vmkd""C:\path\to\decompressed.vmdk" --format VMDK.

It give you a nice status indicator during the process:


Now the file is in a format that can worked with like any other normal vmdk file.

Method 2: Mount in Linux

This is the method that I prefer when dealing with LOTS of vmdk files. This method uses Virtual Box Fuse, and does not require you to decompress/convert the vmkd first.

I had a case involving over 100 of these compressed files. Imagine the overhead time involved with converting 100+ vmdk files before you can even begin to work with them. This way, I was able to write a script to mount each one in Linux, run fls to create a bodyfile, throw some of Harlan's parsers into the mix, and was able to create a 100+ mini-timelines pretty quickly.

There is some initial setup involved but once that's done, it's relatively quick and easy to access the compressed vmdk file.

I'll run though how to install Virtual Box Fuse, how to get the compressed vmkd file  mounted, then run fls on it.

1)Install VirtualBox:

sudo apt-get install virtualbox-qt

2) Install Virtual Box Fuse. It is no longer in the app repository, so you will need to download and install the .deb file - don't worry, it's pretty easy, no compiling required :)

Download the .deb from from Launchpad under "Published Versions". Once you have it downloaded, install it by typing:

sudo dpkg -i --force-depends virtualbox-fuse_4.1.18-dfsg-1ubuntu1_amd64.deb

Note  - this version is not compatible with Virtual Box v. 4.2. At the time of this writing, when I installed Virtual Box on my Ubuntu distro, it was version 4.1 and worked just fine. If you have a newer version of virtual box, it will still work - you just unpack the .deb file and run the binary without installing it. See the bottom of the thread here for more details.

3)Mount the compressed VMDK file read-only


vdfuse -r -t VMDK -f /mnt/evidence/compressed.vmdk /mnt/vmdk

This will created a device called "EntireDisk" and Parition1, Parition2 etc. under /mnt/vmdk


(even though I got this fuse error - everything seems to work just fine)

At this point and time, you can use fls to generate a bodyfile. fls is included in the Sleuth Kit, and is installed on SIFT by default. You may need to specify the offset for your partition.  Run mmls to grab this:


Now that we have the offsets, we can run fls to generate a bodyfile:

fls -r -o 2048 /mnt/vmdk/EntireDisk -m C: >> /home/sansforensics/win7-bodyfile
fls -r -o 206848 /mnt/vmdk/EntireDisk -m C: >> /home/sansforensics/win7-bodyfile


Next, if you want access to the files/folders etc, you will need to mount the EntireDisk Image as an ntfs mount for each partition. This is assuming you have an Windows system - if not, adjust the type accordingly:

Mount Partition 1, Offset 2048:


Mount Parition2, Offset 206848:


There are multiple ways to deal with this compressed format, such as using VMWare or VirtualBox GUI to import/export the compresses file... these are just some examples of a couple of ways to do it. I tend to prefer command line options so I can script out batch files if necessary.


Does it make sense?

$
0
0

Through all my high school and college math classes, my teachers always taught me to step back after a problem was completed and ask if the answer made sense.  What did this mean?  It meant don't just punch numbers into the calculator, write the answer, and move on. It meant step back, review the problem, consider all the known information and ask, "Does the answer I came up with make sense?"

Take for instance the Pythagorean Theorem. Just by looking at the picture, I can see that C should be longer than A or B. If my answer for C was smaller than A or B, I would know to recheck my work.

Although the above example is relatively simple, this little trick applied to more complicated math problems, and many times it helped me catch incorrect answers.

But what does this have to do with DFIR?  I believe the same principle can be applied to investigations. When looking at data, sometimes stepping back and asking myself the question, "Does what I am looking at make sense?" has helped me locate issues I may not have otherwise caught.

I have had a least a couple of DFIR situations where using this method paid off.

You've got Mail...
I was working a case where a user had Mozilla Thunderbird for an email client. I parsed the email with some typical forensic tools and begin reviewing emails.

While reviewing the output, I noticed it seemed pretty sparse, even though the size of the profile folder was several gigs. This is where I stepped back and asked myself, does this make sense? It was a large profile, yet contained very few emails.  This led to my research and eventual blog post on the Thunderbird MBOXRD file format. Many of the programs were just parsing out the MBOX format and not the MBOXRD format, and thus, missing lots of emails. Had I just accepted the final output of the program, I would have missed a lot of data.

All your files belong to us...
Many times I will triage a system either while waiting for an image to complete, or as an alternate to taking an image. This is especially useful when dealing with remote systems that need to be looked at quickly. Exporting out the MFT and other files such as the Event Logs and Registry files results in a much smaller data set than a complete image. These artifacts can then be used to create a mini-timeline so analysis can begin immediately  (see Halan's post here for more details on creating mini-timelines).
 
To parse the MFT file into timeline format, I use a tool called Analyze MFT  to provide a bodyfile. Once the MFT is in bodyfile format, I use Harlan Carvey's parse.pl to convert it into TLN format and add it into the timeline.

While working a case, I created timelines using the above method for several dozen computers. After the timelines were created, I grepped out various malware references from these timelines. While reviewing the results, I noticed many of the malware files had a file size of zero. Weird. I took a closer look andnoticed ALLthe malware files contained a file size of zero. Hmmm.. what did that mean? What are the chances that ALL of those files would have a zero file size??? Since the full disk images were not available, validateing this information with the actual files was not an option. But I stepped backed and asked myself, given what I knew about my case and how the malware behaved.. does that make sense?

So I decided to "check my work" and do some testing with Analyze MFT. I created a virtual machine  with Windows XP and exported out the MFT.  I parsed the MFT with Analyze MFT and began looking at the results for files with a zero file size.

I noticed right away that all the prefetch files had a file size of zero, which is odd.  I was able to verify that the prefetch files sizes were in fact NOT zero by using other tools to parse the MFT, as well as looking at the prefetch files themselves in the VM. My testing confirmed that Analyze MFT was incorrectly reporting a file size of zero for some files.

After the testing I reached out to David Kovar, the author of Analyze MFT, to discuss the issue. I also submitted a bug to the github page.

If I had not "checked my work" and assumed that the the file size of  zero meant the files were empty, it could have led to an incorrect "answer".

So thanks to those teachers that ground the "does it make sense" check into my head, as it has proved to be a valuable tip that has helped me numerous times  (more so then the Pythagorean Theorem...)
Viewing all 40 articles
Browse latest View live